Hallo semua hari ini saya akan menceritakan pengalaman hari ketiga saat prakerin di kampus STMIK AKAKOM Jogjakarta .
pada hari ini saya pertama pindah ke laboratorium tugas akhir mahasiswa setelah dari kantor humas, di awal pertama masuk
hari ini ada penmbagian kelompok, kelompok pertama di nya di reset ulang dan dibagi tugas jadi tugasnya ada 2 tugas kelompok, yang pertama tugas dari kelompok smkn1giritontro , yang kedua kelompok baru kira kira ada 2/3 orang dan disuruh membuat aplikasi berbasis client server dan aplikasi mobile.
Dan berikat adalah contoh game yang berbasis apliksi mobile contohnya game dan berikut cara mmbuatnya

Sekarang, Klik 2x space kosong pada bagian layout untuk memasukkan objek. (Selanjutnya, jika sudah penuh, dapat juga dilakukan dengan cara klik kanan dan pilih Insert new object.) Setelah dialog Insert new object muncul, klik 2x Tiled Background object untuk memasukkannya.

Sebuah crosshair akan muncul untuk menandakan tempat untuk meletakkan objek. Klik dimanapun di bagian tengah layout. Texture editor sekarang terbuka, anda dapat memasukan tekstur ke 'tile'. Segera import 'tile image' yang anda simpan sebelumnya. Klik icon folder untuk memanggil tekstur dari disk, cari di mana anda menyimpannya tadi, dan pilih.

Tutup texture editor dengan cara klik tanda X pada kanan atas. Jika diminta, pastikan anda telah menyimpan data! Sekarang anda akan melihat 'tiled background' objek pada layout. Saatnya mengubah ukurannya sehingga memenuhi layout game. Pastikan objek tersebut telah terseleksi, lalu Properties Bar di sebelah kiri seharusnya menunjukkan semua pengaturan untuk objek tersebut, termasuk ukuran dan posisinya. Atur posisinya menjadi 0, 0 (kiri atas dari layout), dan ukurannya menjadi 1280, 1024 (ukuran dari layout).

Saatnya meninjau progress kita sampai di sini. Tahan control dan lalukan scroll mouse wheel down untuk zoom out. Cara alternatif, klik view - zoom out beberapa kali. Anda juga dapat menekan tombol space, atau tombol tengah mouse, untuk bergeser. Mudah, bukan? Tiled background anda kini telah memenuhi seluruh isi layout:

Tekan kombinasi tombol CTRL+0 atau klik view - zoom to 100% untuk mengembalikan ke sudut pandang 1:1.
pada hari ini saya pertama pindah ke laboratorium tugas akhir mahasiswa setelah dari kantor humas, di awal pertama masuk
hari ini ada penmbagian kelompok, kelompok pertama di nya di reset ulang dan dibagi tugas jadi tugasnya ada 2 tugas kelompok, yang pertama tugas dari kelompok smkn1giritontro , yang kedua kelompok baru kira kira ada 2/3 orang dan disuruh membuat aplikasi berbasis client server dan aplikasi mobile.
Dan berikat adalah contoh game yang berbasis apliksi mobile contohnya game dan berikut cara mmbuatnya
Selamat anda telah memilih Construct 2! Saatnya memulai membuat game HTML5 pertama anda. Kita akan membuat 'Ghost Shooter' demo game. Coba di sini terlebih dahulu sehingga kamu tahu apa tujuan yang ingin kita capai: seorang pemain yang akan melihat ke arah sudut pandang mouse, bergerak dengan 'arrow keys', dan menembak monster dengan mouse. Anda akan mempelajari semuanya yang dibutuhkan untuk mengetahui cara membuat game sederhana - dari 'layers' sampai dengan 'event system'!
*Catatan: harap jangan bertanya untuk bantuan di dalam komentar pada tutorial ini! Daripada itu, mampirlah ke forum kami untuk mendapatkan respon terbaik dari berbagai pertanyaan yang anda miliki.
Tutorial-Tutorial Alternatif
Ini adalah tutorial alternatif untuk pemula: How to make a platform game, ditujukan untuk membuat sebuah 'jump-and-run platformer' daripada sebuah 'top down shooter'. Anda dapat memulainya dengan tutorial lainnya, akan tetapi kami merekomendasikan anda untuk menyelesaikan keduanya sehingga anda akan mendapatkan ide dasar bagaimana cara membuat kedua jenis game ini.
Ada juga How to make an Asteroids clone in under 100 events oleh Kyatric yang sedikit lebih sulit namun sangat detail.
Menginstall Construct 2
Jika anda belum memilikinya, segera dapatkan Construct 2 di sini. Construct 2 Editor hanya dapat digunakan pada Windows, akan tetapi game yang anda buat dapat dijalankan di banyak platform, seperti Mac, Linux, dan iPad. Construct 2 juga dapat diinstal pada 'user account' yang terbatas. Sifatnya juga 'portable', jadi anda dapat menginstallnya di USB Stick, dan membawanya bersamamu!
Segera Memulai
Sekarang anda sudah siap, jalankan Construct 2. Klik tombol File, dan pilih New.

Pada dialog New Project ini, anda tidak perlu mengganti apapun. Cukup mengklik Create project. Construct 2 akan menyimpan data seluruh project kita dalam sebuah file .capx. Sekarang anda akan melihat layoutkosong - sudut pandang 'design' di mana anda dapat membuat dan mengatur posisi objek. Pikirkan sebuah layout seperti sebuah level game atau layar menu. Di 'tool' lain, ini dapat juga disebut sebagai room, sceneatau frame.
Pada dialog New Project ini, anda tidak perlu mengganti apapun. Cukup mengklik Create project. Construct 2 akan menyimpan data seluruh project kita dalam sebuah file .capx. Sekarang anda akan melihat layoutkosong - sudut pandang 'design' di mana anda dapat membuat dan mengatur posisi objek. Pikirkan sebuah layout seperti sebuah level game atau layar menu. Di 'tool' lain, ini dapat juga disebut sebagai room, sceneatau frame.
Memasukan Objek
Tiled Background
Hal pertama yang ingin kita lakukan adalah melakukan perulangan terhadap 'background tile'. Objek Tiled Background dapat melakukan hal ini untuk kita. Pertama, siapkan tekstur background berikut ini - klik kanan dan simpan ke dalam folder manapun dalam komputer anda:
Sekarang, Klik 2x space kosong pada bagian layout untuk memasukkan objek. (Selanjutnya, jika sudah penuh, dapat juga dilakukan dengan cara klik kanan dan pilih Insert new object.) Setelah dialog Insert new object muncul, klik 2x Tiled Background object untuk memasukkannya.
Sebuah crosshair akan muncul untuk menandakan tempat untuk meletakkan objek. Klik dimanapun di bagian tengah layout. Texture editor sekarang terbuka, anda dapat memasukan tekstur ke 'tile'. Segera import 'tile image' yang anda simpan sebelumnya. Klik icon folder untuk memanggil tekstur dari disk, cari di mana anda menyimpannya tadi, dan pilih.
Tutup texture editor dengan cara klik tanda X pada kanan atas. Jika diminta, pastikan anda telah menyimpan data! Sekarang anda akan melihat 'tiled background' objek pada layout. Saatnya mengubah ukurannya sehingga memenuhi layout game. Pastikan objek tersebut telah terseleksi, lalu Properties Bar di sebelah kiri seharusnya menunjukkan semua pengaturan untuk objek tersebut, termasuk ukuran dan posisinya. Atur posisinya menjadi 0, 0 (kiri atas dari layout), dan ukurannya menjadi 1280, 1024 (ukuran dari layout).
Saatnya meninjau progress kita sampai di sini. Tahan control dan lalukan scroll mouse wheel down untuk zoom out. Cara alternatif, klik view - zoom out beberapa kali. Anda juga dapat menekan tombol space, atau tombol tengah mouse, untuk bergeser. Mudah, bukan? Tiled background anda kini telah memenuhi seluruh isi layout:
Tekan kombinasi tombol CTRL+0 atau klik view - zoom to 100% untuk mengembalikan ke sudut pandang 1:1.
(Jika kamu tipe orang yang 'tidak sabaran' seperti saya, klik ikon kecil 'run' pada jendela title bar - browser anda akan menampilkan tiled layout sesuai dengan yang anda telah buat! Woo! Senangnya :D)
Pkl hari Ke-3
Pada tutorial ini anda akan belajar bagaimana membuat aplikasi client server menggunakan visual basic & MYSQL Untuk lebih memperjelas pemahaman anda akan digunakan studi kasus program KASIR.
Dimana pada implemantasinya nanti, aplikasi yang dibuat akan terpisah
dengan database. Database akan ditempatkan pada sebuah server dan
aplikasi dapat ditempatkan pada beberapa komputer client. Untuk
pengembangan / pembuatan aplikasinya sendiri dapat dilakukan di komputer
lokal terlebih dahulu. Adapun yang anda perlukan pada tutorial ini,
yaitu visual basic,MYSQL,
dan Mysql Connector-ODBC. MYSQL dan MYSQL Connector ODBC dapat anda
download di www.mysql.com. MYSQL Connector ODBC dibutuhkan agar dapat
melakukan koneksi database MYSQL dari VB
Setelahnya semuanya terinstall mulailah membuat database MYSQL beserta tabel - tabelnya. Buatlah sebuah database dengan nama kasir, dan buat 5 tabel seperti di bawah:
Tabel user_login
| Field | Tipe Data |
| user_login_id | varchar(50) * |
| user_name | varchar(100) |
| user_psw | varchar(20) |
Tabel product
| Field | Tipe Data |
|---|---|
| product_id | varchar(40) * |
| product_name | varchar(100) |
| price | double |
| stock | integer |
Tabel transaksi
| Fields | Tipe Data |
|---|---|
| no_transaksi | integer (auto increment) * |
| tgl_transaksi | datetime |
| total_barang | integer |
| total_harga | double |
| kasir | varchar(50) |
Tabel detail_transaksi
| Fields | Tipe Data |
|---|---|
| no_transaksi | integer |
| product_id | varchar(40) |
| jumlah | integer |
| harga_satuan | double |
Tabel transaksi_temp
| Fields | Tipe Data |
|---|---|
| no_transaksi | integer |
| product_id | varchar(40) |
| jumlah | integer |
| harga_satuan | double |
* Primary Key
Tabel user_login digunakan untuk
menyimpan data pengguna aplikasi, tabel product digunakan untuk
menyimpan data product yang dijual. Tabel transaksi untuk menyimpan data
transaksi dan tabel detail_transaksi untuk menyimpan detail dari
transaksi yang dilakukan. Sedangkan tabel traksaksi_temp digunakan untuk
mencatat secara sementara detail traksaksi yang dilakukan, setelah
transaksi selesai dilakukan baru dipindahkan ke tabel transaksi.
Setelah database dan kasir selesai dibuat tambahkan data (insert data) pada tabel user dengan data berikut:
| user_login_id | user_name | user_psw |
|---|---|---|
| admin | Administrator | admin |
langkah selanjutnya adalah mempersiapkan koneksi ke database. Ikutilah langkah-langkah di bawah ini.
- Buka control panel, double klik pada Administrative Tools, kemudian double klik pada Data Sources (ODBC). Dan akan muncul window kurang lebih seperti berikut:

- Klik pada System DSN, dan klik tombol Add, dan akan muncul window seperti berikut:

- Pilih MySQL ODBC 3.5.1 Driver, dan klik tombol Finish, dan akan tampil window berikut :

- Kemudian isi form di atas dengan data seperti berikut:

- Klik tombol Test, jika muncul kotak dialog yang menyatakan sukses, tekan OK dan tekan OK sekali lagi.
Setelah selesai sekarang anda telah siap untuk membuat Aplikasi KASIR..
Membuat Form Utama Administrator dan Form Login
Buka microsoft visual basic anda dan buat Standar EXE project. Setelah
project dibuat akan langsung terbentuk sebuah form. Tambahkan label dan
tombol serta atur propertiesnya seperti berikut

| Komponent | Properties |
|---|---|
| Form1 | Name : main_form Caption : Administration |
| Label1 | Caption : Welcome, |
| Label2 | Name : label_user Caption : User |
| Command1 | Name : btn_user Caption : User |
| Command2 | Name : btn_product Caption : Product |
| Command3 | Name : btn_trans Caption : Transaksi |
| Command4 | Name : btn_report Caption : Report |
Setelah diatur propertinya maka hasilnya adalah seperti berikut:

Admin Form
Kemudian Buat Form baru dengan cara, klik Menu Project, Add Form. Akan tampil window Add Form dan pilih Log In Dialog serta klik tombol open. Hasilnya seperti di bawah:

Form Login
Sekarang buka notepad dan ketik kode di bawah:
[Data]
DB=kasir
SERVER=localhost
Uid=root
Password=root
DB=kasir
SERVER=localhost
Uid=root
Password=root
Kemudian simpan di direktori c:\windows dengan nama koneksi.ini, file koneksi.ini berfungsi untuk menyimpan data yang diperlukan untuk koneksi ke database. Pada bagian DB berisi nama database yang akan digunakan,SERVER berisi IP address Server tempat database disimpan (untuk sementara gunakan lokalhost). Uid berisi database user name dan Passwordadalah password database.
Sekarang Kembali ke Editor Visual
Studio. Pilih Menu Project, Add Module untuk membuat module. Pada
window Add Module klik Open. Download File berikut ini,
kemudian copy dan paste isi file tersebut pada module yang sedang
dibuat. Setelah selesai simpan module tersebut. Kemudian Klik menu
Project, References dan akan muncul window project reference. Centang
pada bagian Micosoft ActiveX Data Objects 2.0 Library dan tekan tombol OK.
Sekarang beralih ke form login, double click pada tombol OK, Hapus script yang telah ada dan ganti dengan script di bawah:
Private Sub cmdOK_Click()
Call Koneksi
Dim RS As ADODB.Recordset
Set RS = New ADODB.Recordset
Dim SQL As String
'query untuk login
SQL = "select * from user_login where user_login_id='" & txtUserName.Text & "'"
'membuka koneksi ke databse
RS.CursorLocation = adUseClient
RS.Open SQL, conn, adOpenDynamic, adLockOptimistic
'cek kebenaran user_login_id
If (RS.RecordCount > 0) Then
'cek kebenaran password
If (RS!user_psw = txtPassword.Text) Then
user_login_id = txtUserName.Text
user_name = RS!user_name
Load main_form
main_form.Show
Unload Me
Else
MsgBox "Maaf Password Salah"
End If
Else
MsgBox "Maaf User Name Salah"
End If
End Sub
Kemudian double click pada tombol Cancel, hapus script yang telah ada dan ganti dengan script berikut:
Private Sub cmdCancel_Click()
Dim pil As VbMsgBoxResult
pil = MsgBox("Anda Yakin untuk keluar?", vbQuestion + vbYesNo, "Exit")
If (pil = vbYes) Then Unload Me
End Sub
Dim pil As VbMsgBoxResult
pil = MsgBox("Anda Yakin untuk keluar?", vbQuestion + vbYesNo, "Exit")
If (pil = vbYes) Then Unload Me
End Sub
Setelah selesai pilih menu Project, properties. Pada window Project Properties di bagian Startup Object pilih frmLogin. Kemudian tekan tombol OK.
Sekarang beralih ke admin_form, double click pada form dan ketik script berikut :
Private Sub Form_Load()
label_user.Caption = user_name
End Sub
label_user.Caption = user_name
End Sub
Setelah selesai simpan project anda dengan nama kasir dan coba untuk menjalankanya dengan menekan tombol F5 pada keybord.
Pada tutorial Membuat Aplikasi
Client Server dengan VB & MYSQL ini anda telah belajar bagimana
menginstall MySQL connector ODBC, melakukan koneksi ke database MySQL
dengan ADODB, serta membuat system login. Pada tutorial selanjutnya
akan dijelaskan Proses membaca data dari tabel, menampilkan data, menambahkan data ke tabel, mengedit record pada tabel dan menghapus record.
source: myphptutorials.com
UPDATE 17 June 2013
quote :
" Databasenya mau pakai apa,
Database Server(sql server,mysql) atau database File (Ms. Access)
misal database yang dipakai SQL Server :
* pertama database server harus terinstall terlebih dahulu di salah satu komputer
* jika sudah berarti program di tiap-tiap client harus merujuk ke database yg sql servernya terinstall, agar data yang di olah bisa sama untuk seluruh client.
* dan... di masing-masing client untuk bisa masuk ke database server harus mengisi login dari server terserbut
misal:
computer name = server
user database = sa
password database = ***
database = dbinventory
* dan... agar program di client bisa jalan, component-component yang diperlukan harus sudah terinstall (teregistrasi) di client tersebut "
" kalau databasenya ms access
database tersebut tempatkan di computer server terus folder dimana
database tersebut berada harus di Share (supaya komputer client bisa
memanggil)
dan untuk koneksinya (menambahkan code diatas):
Dim con As ADODB.ConnectionDim pathDb As String
pathDb = "\\compServer\dbStok.mdb"
con.ConnectionString = "Provider=Microsoft.Jet.OLEDB.4.0;Data Source="
& pathDb & ";Persist Security Info=False"con.Open
"
Creating Client/Server Application using Winsock
INTRODUCTION
Most of you might have worked
with Internet Transfer Control which is very handy control when it comes
to Internet Programming but there is another control which even more
robust and helps programmers creating more flexible applications.
Winsock control comes with VB6 and is used to create applications that
access the low-level functions of the Transmission Control
Protocol/Internet Protocol (TCP/IP).
TCP/IP is a specification that defines a series of protocols used to standardize how computers exchange information with each other. TCP/IP provides communication across interconnected networks that use diverse hardware architectures and various operating systems. The protocols in TCP/IP are arranged in a series of layers known as a protocol stack. Each layer has its own functionality.
Winsock is a standard that is
maintained by Microsoft. This standard is basically a set of routines
that describe communications to and from the TCP/IP stack. These
routines reside in a dynamic link library that runs under Windows. The
winsock DLL is interfaced with TCP/IP and from there through the
Internet.
In this article, I am going to
show how to use the winsock in a client server environment, we will
create two separate applications, one of which will be a server and the
other will be a client. Both client and server will interact with each
other to exchange data. Client will send a request to the server and the
server which will be connected to a database will retrieve the
information requested by the client from the database and will return
the requested information back to the client. You will a database with
this article, the database contains the item numbers and their prices.
In real life situations, database might be located on a machine
different from the one that hosts the client application.
I think it would be better to talk about the ports before we proceed any further. A port is a special memory location that exists when two computers are in communication via TCP/IP. Applications use a port number as an identifier to other computers, both the sending and receiving computers use this port to exchange data.
To make the job of communication easier, some port numbers have been standardized. These standard port numbers have no inherent value other than that users have agreed to use them with certain applications. Table below lists a number of popular and publicly accepted port numbers and their corresponding applications.
Service
|
Port
|
| HTTP | 80 |
| FTP | 20,21 |
| GOPHER | 70 |
| SMTP | 25 |
| POP3 | 110 |
| TELNET | 23 |
| FINGER | 79 |
| LOCAL LOOPS/CALLBACKS | 0 |
Using the Winsock Control
Winsock is above the TCP/IP
protocol stack in the ISO/OSI model. TCP/IP is an industry standard
communication protocol that defines methods for packaging data into
packets for transmission between computing devices on a heterogeneous
network. TCP/IP is the standard for data transmission over networks,
including the Internet. TCP establishes a connection for data
transmission and IP defines the method for sending data packets.
The Microsoft Winsock control
makes using the TCP/IP a breeze. Microsoft has wrapped up the Winsock
and INetAPI API calls into a nice neat package that you can easily
incorporate into your Visual Basic applications.Winsock Operating Modes
The Transport layer (also known
as the Host-to-Host Transport layer) is responsible for providing the
Application layer with session and datagram communication services. The
core protocols of the Transport layer are TCP and User Datagram Protocol
(UDP). The Winsock control supports the following two operating modes:
- sckTCPProtocol
- sckUDPProtocol
Winsock Properties
Winsock enables you to create
clients and servers using the same control. This dual functionality
enables you to specify through property setting the type of application
you will be building. The Winsock control uses a number of the same
properties, whether you are creating client or a server, thereby all but
eliminating the learning curve needed to create applications. Some of
the important properties of the control are as following:
BytesReceived Property
This property returns the number of bytes currently in the receive buffer. This is a read-only property and is unavailable at design time. The value returned is a long integer.
LocalHostName Property
The LocalHostName property returns the name of the local host system. This is read-only property and is unavailable at the design time. The value returned is a string.
LocalIP Property
The LocalIP property returns the local host system IP address in the form of a string, such as 11.0.0.127. This property is read-only and is unavailable at design time.
LocalPort Property
This property returns or sets the local port number. This can be both read from and written to and is available at both design time and runtime. The value returned is a long integer.
Protocol Property
Returns or sets the protocol, either TCP or UDP, used by the Winsock control.
RemoteHost Property
The RemoteHost property returns or sets the remote host. This can be both read from and written to and is available both in design time and runtime. The value returned is a string and can be specified either as an IP address or as a DNS name.
RemotePort Property
This property returns or sets the remote port number.
State Property
This returns the state of the control as expressed by an enumerated list. This is read-only property and is unavailable at design time.
Winsock Methods
Some of the important methods of Winsock control are as following:
Accept Method
It accepts the request for connection from the client system. For this method to be used, the control must be in the listening state.
Close Method
The Close method terminates a TCP connection from either the client or server applications.
GetData Method
GetData is the method that retrieves the current block of data from the buffer and then stores it in a variable of the variant type.
PeekData Method
The PeekData method operates in a fashion similar to the GetData method. However, it does not remove data from the input queue.
Listen Method
This is invoked on the server application to have the server application wait for a TCP request for connection from a client system.
SendData Method
This method dispatches data to the remote computer. It is used for both the client and server systems.
Connect Method
The Connect method requests a connection to a remote computer.
I am not going to discuss events here. You can find the complete details of events on the Microsoft site (http://www.microsoft.com).
In the sample provided with this article, we are going to create two applications, one server and client. This is a real world example, where the clients requests some information from the server and the server retrieves some specific information from the database and sends the retrieved information back to the client. The database used in the sample is also provided with the code. The database name is Prices.mdb. This is a small database comprising of a single table containing two fields. The fields are item number and price. The clients sends the item number to the server and the server retrieves the price against that item number from the database and sends it back to the client. One of the current trends in software development today is the issue of thick clients versus thin clients. A thick client is basically an application that performs the bulk of the processing on the individual client PC, whereas a thin client performs the processing on the server.
Creating the Client
Follow the steps shown below:
1. Start a new EXE project.
2. Add a Winsock control to your application.
3. Add all the controls to the form (See the application for details).
Here is the complete code:
1. Start a new EXE project.
2. Add a Winsock control to your application.
3. Add all the controls to the form (See the application for details).
Here is the complete code:
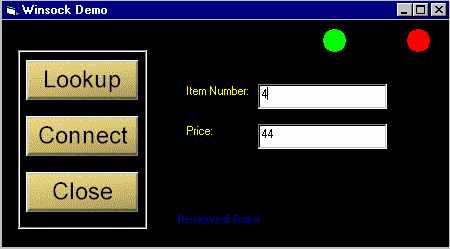
Option Explicit Private Sub cmdClose_Click() Winsock1.Close shpGo.Visible = False shpWait.Visible = False shpError.Visible = True End Sub Private Sub cmdConnect_Click() Winsock1.RemoteHost = "11.0.0.1" 'Change this to your host ip Winsock1.RemotePort = 1007 Winsock1.Connect shpGo.Visible = True txtItem.SetFocus End Sub Private Sub cmdSend_Click() If Winsock1.State = sckConnected Then Winsock1.SendData txtItem.Text shpGo.Visible = True Label3.Caption = "Sending Data" Else shpGo.Visible = False shpWait.Visible = False shpError.Visible = True Label3.Caption = "Not currently connected to host" End If End Sub Private Sub Winsock1_DataArrival(ByVal bytesTotal As Long) Dim sData As String Winsock1.GetData sData, vbString 'Label1.Caption = sData txtPrice.Text = sData Label3.Caption = "Received Data" shpGo.Visible = True shpWait.Visible = False shpError.Visible = False End Sub Private Sub Winsock1_SendComplete() Label3.Caption = "Completed Data Transmission" End Sub
Creating the Server
The server portion of the price
lookup example is designed to accept the item number sent from the
client and look up the associated price in a database. The server than
sends the information back to the client. There is file named as
�path.txt� in the folder called as �server�. Locate that file and change
the database path in the file to the location where the database is
located on your machine. The connection to the database is made in the
DataArrival event of the Winsock control. The following code segment
opens the database and finds the first occurrence of the value in
sItemData. When the record is found, the value contained in the price
field is sent back to the client.
' Get clients request from database strData = "Item = '" & sItemData & "'" rs.Open "select * from prices", strConnect, adOpenKeyset,adLockOptimistic rs.Find strData strOutData = rs.Fields("Price")
Follow the steps shown below to create the server:
1. Start a new Standard EXE in VB.
2. Add the Winsock control to your application.
3. Add the controls to the form as shown in the accompanying code (See the folder named as �server�).
Here is the complete code:
2. Add the Winsock control to your application.
3. Add the controls to the form as shown in the accompanying code (See the folder named as �server�).
Here is the complete code:
Option Explicit Dim iSockets As Integer Dim sServerMsg As String Dim sRequestID As String Private Sub Form_Load() Form1.Show lblHostID.Caption = Socket(0).LocalHostName lblAddress.Caption = Socket(0).LocalIP Socket(0).LocalPort = 1007 sServerMsg = "Listening to port: " & Socket(0).LocalPort List1.AddItem (sServerMsg) Socket(0).Listen End Sub Private Sub socket_Close(Index As Integer) sServerMsg = "Connection closed: " & Socket(Index).RemoteHostIP List1.AddItem (sServerMsg) Socket(Index).Close Unload Socket(Index) iSockets = iSockets - 1 lblConnections.Caption = iSockets End Sub Private Sub socket_ConnectionRequest(Index As Integer, ByVal requestID As Long) sServerMsg = "Connection request id " & requestID & " from " & Socket(Index).RemoteHostIP If Index = 0 Then List1.AddItem (sServerMsg) sRequestID = requestID iSockets = iSockets + 1 lblConnections.Caption = iSockets Load Socket(iSockets) Socket(iSockets).LocalPort = 1007 Socket(iSockets).Accept requestID End If End Sub Private Sub socket_DataArrival(Index As Integer, ByVal bytesTotal As Long) Dim sItemData As String Dim strData As String Dim strOutData As String Dim strConnect As String ' get data from client Socket(Index).GetData sItemData, vbString sServerMsg = "Received: " & sItemData & " from " & Socket(Index).RemoteHostIP & "(" & sRequestID & ")" List1.AddItem (sServerMsg) 'strConnect = "Provider=Microsoft.Jet.OLEDB.4.0;Data Source=G:\Prices.mdb;Persist Security Info=False" Dim strPath As String 'Change the database path in the text file Dim fso As New FileSystemObject, txtfile, _ fil1 As File, ts As TextStream Set fil1 = fso.GetFile("path.txt") ' Read the contents of the file. Set ts = fil1.OpenAsTextStream(ForReading) strPath = ts.ReadLine ts.Close Set fso = Nothing strConnect = "Provider=Microsoft.Jet.OLEDB.4.0;" & _ "Persist Security Info=False;Data Source=" & strPath & _ "; Mode=Read|Write" Dim rs As New ADODB.Recordset ' Get clients request from database strData = "Item = '" & sItemData & "'" rs.Open "select * from prices", strConnect, adOpenKeyset, adLockOptimistic rs.Find strData strOutData = rs.Fields("Price") 'send data to client sServerMsg = "Sending: " & strOutData & " to " & Socket(Index).RemoteHostIP List1.AddItem (sServerMsg) Socket(Index).SendData strOutData End Sub
Running the example
1. Create executable for both the applications.
2. Launch both the applications.
3. Click the Connect button.
4. Enter a value from 0 to 6 (currently the database contains only six records, error handling is not done in this code, you can add the error handling yourself) and click the Lookup button. The associated price will be displayed in the price field.
source: codeproject.com
cara membuat aplikasi client server
Kali ini saya mencoba untuk memberikan panduan kecil bagaimana membuat website dengan biaya nol rupiah, alias gratis (FREE).
Hanya dengan beberapa langkah cepat dan mudah, anda sudah dapat membuat
website sendiri. Tentu saja biaya pembuatan websitenya tidak
benar-benar nol rupiah, karena anda sendiri perlu meluangkan waktu di
depan komputer yang terkoneksi internet (bisa di rumah / warnet) yang
juga butuh biaya.. betul..betul..betul..? 
 kecuali kalo komputer / koneksi internetnya juga gratisan (numpang di
temen, minjem tetangga atau pake laptop pacar di area hotspot gratis ..
kecuali kalo komputer / koneksi internetnya juga gratisan (numpang di
temen, minjem tetangga atau pake laptop pacar di area hotspot gratis ..  )
)
Oke.. kita langsung mulai saja langkah-langkah Membuat Website Gratis ( FREE ):
Saat ini, ada 2 web service yang paling dominan yang menyediakan web blogging secara gratis. Artinya anda dapat membuat web blog di website tersebut, yaitu Blogger.com dan WordPress.com. Blogger.com merupakan web blog yang disediakan oleh Google, sedangkan WordPress.com merupakan web blog service yang menggunakan WordPress sebagai platform bloggingnya.
Kedua web blog service tersebut masing-masing memiliki kekurangan dan kelebihan. Namun saat ini kita ga usah perdulikan itu dulu, yang penting pelajari keduanya, nanti silahkan pilih mana yang lebih anda sukai.
Silahkan baca catatan saya tentang panduan membuat website di WordPress.com untuk langkah-langkahnya.
Di Indonesia, khususnya di Jakarta dan kota-kota besar lainnya bertebaran penyedia layanan web design & pembuatan website profesional. Mulai dari perusahaan besar, hingga kelompok atau perorangan. Selain web programming, kami juga memberikan layanan web design & pembuatan website profesional secara menyeluruh. Mulai dari design awal, tema, pemrogramannya, hingga optimalisasinya agar website terekspos di mesin-mesin pencari seperti Google, Yahoo dan Bing. Jika anda tertarik dengan layanan web design kami, silahkan hubungi kami. Kami memberikan konsultasi Gratis sebelum anda memutuskan menggunakan jasa kami untuk membuat website anda.
Oke.. kita langsung mulai saja langkah-langkah Membuat Website Gratis ( FREE ):
Siapkan Nama Website & Topik / Fokus Website
Ini penting, karena banyak dari kita yang ‘cuma pengen’ punya website, tapi ga tau isi websitenya mo ngebahas apa. Ada beberapa website kadang bahkan isi / kontennya ga nyambung atau seringnya cuma berisi ‘sampah’ alias konten-konten yang gada artinya. Semakin dini anda memilih dan menentukan topik / fokus website, maka semakin baik pula kualitas website yang anda buat. Semakin berkualitas isi website anda, otomatis semakin banyak juga pengunjung yang berkunjung ke website anda. Ingat! pesen mbah Google, “…buatlah website untuk pengunjung anda, bukan untuk mesin pencari…”Buat Website di Blogger atau WordPress ?
Tahap selanjutnya menentukan tipe website dan dimana anda akan membuat website. Cara yang paling mudah adalah membuat website blogging, karena website jenis ini paling mudah dibuat. Dan tentu saja, jika anda sudah memahami dan cukup user friendly dengan blogging, maka anda bisa mengembangkannya ke website jenis lain. Ingat, CMS (Content Management System) seperti WordPress tidak hanya dapat digunakan untuk Blogging saja, tapi juga dapat dikembangkan untuk website jenis lain seperti company profile, personal portfolio, photo portfolio, online shopping dan lain sebagainya.Saat ini, ada 2 web service yang paling dominan yang menyediakan web blogging secara gratis. Artinya anda dapat membuat web blog di website tersebut, yaitu Blogger.com dan WordPress.com. Blogger.com merupakan web blog yang disediakan oleh Google, sedangkan WordPress.com merupakan web blog service yang menggunakan WordPress sebagai platform bloggingnya.
Kedua web blog service tersebut masing-masing memiliki kekurangan dan kelebihan. Namun saat ini kita ga usah perdulikan itu dulu, yang penting pelajari keduanya, nanti silahkan pilih mana yang lebih anda sukai.
Bagaiman Cara Membuat Website di Blogger ?
Untuk membuat website / web blog di Blogger.com, silahkan baca panduan lengkapnya di catatan saya tentang Panduan Membuat Website di Blogger. Catatannya sengaja saya pisahkan agar bahasannya lebih fokus dan tidak terlalu panjang.Kalau Membuat Website di WordPress, Bagaimana Caranya ?
Cara membuat website / web blog di WordPress.com kurang lebih mirip dengan cara membuat website / web blog di Blogger.com. WordPress.com sendiri juga menyediakan WordPress versi bahasa Indonesia, jadi sepertinya tidak ada kesulitan apapun untuk membuat website di WordPress, kecuali mungkin koneksi internet anda yang tiba-tiba lemot & bikin jengkelMembuat Website Profesional vs Website Gratisan
Membuat website gratis ( FREE ) cocok jika website digunakan hanya untuk keperluan pribadi, atau hal-hal lain yang sifatnya tidak terlalu resmi. Namun jika website yang akan dibuat digunakan untuk profil atau portfolio (personal atau company) serta mempromosikan suatu produk atau jasa, maka cara ‘gratisan’ sangat tidak disarankan. Anda harus mengeluarkan kocek sedikit untuk membuat website profesional. Selain berfungsi sebagai ‘branding‘, website profesional juga dapat memberikan nilai lebih akan produk atau jasa yang anda tawarkan.Di Indonesia, khususnya di Jakarta dan kota-kota besar lainnya bertebaran penyedia layanan web design & pembuatan website profesional. Mulai dari perusahaan besar, hingga kelompok atau perorangan. Selain web programming, kami juga memberikan layanan web design & pembuatan website profesional secara menyeluruh. Mulai dari design awal, tema, pemrogramannya, hingga optimalisasinya agar website terekspos di mesin-mesin pencari seperti Google, Yahoo dan Bing. Jika anda tertarik dengan layanan web design kami, silahkan hubungi kami. Kami memberikan konsultasi Gratis sebelum anda memutuskan menggunakan jasa kami untuk membuat website anda.
Web Design Cara Membuat Website Gratis ( FREE )

Sepertinya diantara sobat2 semua (termasuk saya) bertanya-tanya gimana sich cara mengganti layout facebook?, sebenarnya sampe sekarang yang punya Facebook ga ngizinin kita sebagai pengguna untuk mengganti layout yang udah disediakan. Tapi kalo sobat bosan dengan layout Facebook sekarang yang hanya berwarna putih-biru aja, sobat bisa mencoba dengan layout yang baru yang lebih enak dilihat.
Adapun Jika Sobat ingin Mengganti Layout Fb Sobat dengan Foto Sendiri..
contoh lihat DIATAS
anda tertarik untuk mengganti layout facebook,,,??
berikut caranya,,
simak baik-baik yahh...
- download addon layout facebook nya >> "Di Sini" <<
- install addonya layout facebook nya
- restart firefox
- >> "Langsung Ke sini aja" << buat pilih-pilih layout facebook (Gapake lama)
- pilih stylish yang anda suka yang nantinya akan di pakai untuk layout facebook
- klik install
gini nih cara nya sob,
- Buka menu add ons mozila / chrome nya
- Cari di bagian paling bawah yang bertuliskan " user stylish "
- lalu klik " edit "

- sebagai contoh saya mengunakan "stylish dark shiny blue."
- lalu carilah kode berikut " background: url("http://i795.photobucket.com/albums/yy232/DaedalusIcarusHelios/Wallpaper/tech3.jpg") " kode url berbeda tiap stylishnya.
- Ganti kode background url yang berwarna merah dengan url foto yang mau kamu jadi kan background, kalo belum punya kodenya, upload aja foto sobat di >> SINI << ( Disarankan fotonya beresolusi sedang agar tidak memperlambat loading)
- setelah semua nya beres, klik save.
- lihatnya tampilan layout facebook anda segera :)

Alhamdulillah Berhasil
untuk contoh lihat DIATAS
cara ganti layout FaceBook Dengan Foto Sendiri (WORK 100%)
Assalamualaikum wr.wb
saya disini ingin membagikan game online simulator yang seru. game untuk hp. disini kita dapat merasakan hidup
seperti :
1. berternak
2. cium orang
3. berteman
4. berkelahi
5. dll
nama akun saya adif69 bagi yang bertemu saya bisa langsung add saya oke..
oke tanpa basa basi lagi silah kan comot gamenya di link dibawah ini, jika ada kerusakan link harap melapor. di bawah ini terdapat SSnya


sekian postingan dari saya
wassalamualaikum wr.wb
Bisa di download di bawah ini :
avatar online.jar
saya disini ingin membagikan game online simulator yang seru. game untuk hp. disini kita dapat merasakan hidup
seperti :
1. berternak
2. cium orang
3. berteman
4. berkelahi
5. dll
nama akun saya adif69 bagi yang bertemu saya bisa langsung add saya oke..
oke tanpa basa basi lagi silah kan comot gamenya di link dibawah ini, jika ada kerusakan link harap melapor. di bawah ini terdapat SSnya
sekian postingan dari saya
wassalamualaikum wr.wb
Bisa di download di bawah ini :
avatar online.jar
Avatar Online
Langganan:
Postingan
(
Atom
)